Lifestyle
WordPress Performance Plugins: Caching, Images, and Feature Conflicts
WordPress performance plugins need settings matched to the actual site; enabling every option at once is unsafe. Using a small Taiwan-based course and shop site, this guide compares WP Rocket and NitroPack, divides responsibility for caching and images, and shows how to diagnose conflicts caused by CSS and JavaScript optimization. A comparison table, staged workflow, and original diagram help administrators retain a measurement baseline and verify forms, menus, and shopping flows.
About 7 min read
Contents
- 1. Inventory existing tools before duplicating their work
- 2. Establish a baseline and a way back first
- 3. With WP Rocket, add one feature at a time
- 4. With NitroPack, understand mode changes first
- 5. If the layout breaks or a button fails, narrow the cause
- 6. Check shopping and membership flows separately
A faster homepage score is not a finished job if the mobile menu no longer opens. A performance plugin changes how some files are generated, loaded, or run, so its settings must be checked alongside the theme, forms, membership features, and hosting environment.
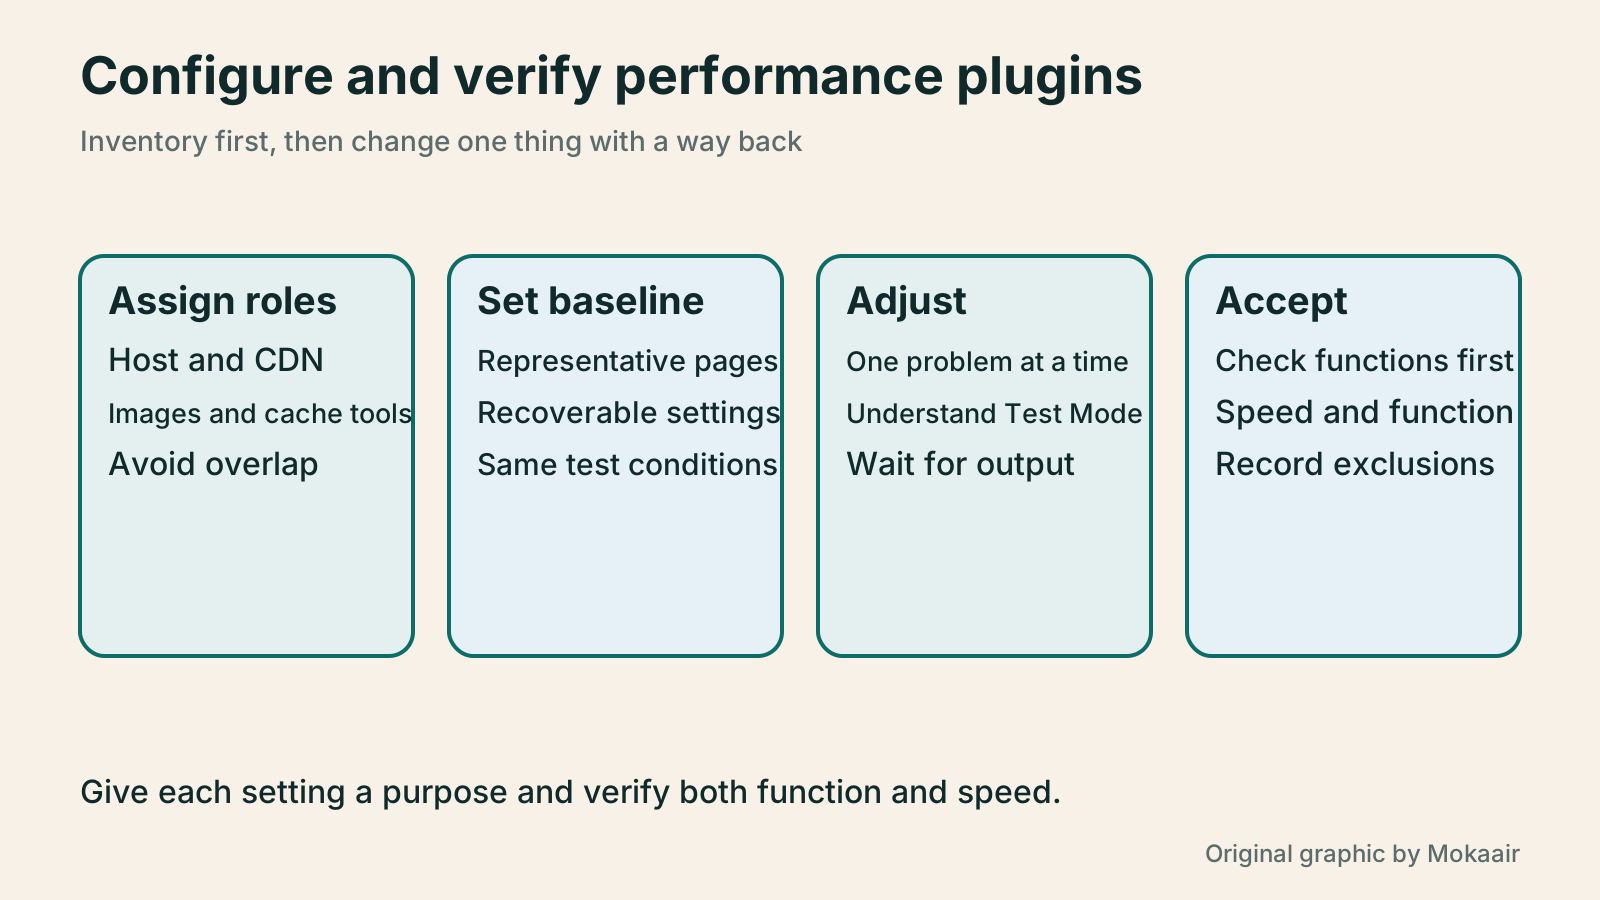
Before choosing a tool, inventory the features already enabled. Decide which service will handle caching, images, and code assets. Add settings through small tests so every speed or behavior change has a traceable cause and a conflict can be reversed.
Inventory existing tools before duplicating their work
List the host cache, CDN, image plugins, page builder, and other performance tools. Record the active functions of each. Tools with different names can still both process lazy loading, CSS, or JavaScript. Compatibility depends on actual settings and integrations, not merely the number of installed plugins.
NitroPack explicitly warns that another tool handling page caching, image lazy loading, or CSS/JavaScript optimization at the same time may interfere with its mechanisms. Its documentation lists WP Rocket among tools it does not recommend using alongside NitroPack. Do not enable both expecting their gains to stack.
Some conflicts concern only one feature. NitroPack’s compatibility guidance for Smush, for example, calls for disabling Smush lazy loading, rather than removing the entire image plugin. Define responsibilities from the current documentation and verify them on a test site. Check the host’s integration rules separately for built-in caching instead of applying every plugin-disable list universally.
Establish a baseline and a way back first
For a site that offers courses and sells products, select the homepage, a course page, a product page, the contact page, and the shopping flow as representative cases. Save the current appearance, functional results, measurements taken under the same conditions, and plugin and theme versions. Without a baseline, a later problem is hard to attribute to the new setting.
Back up the site and its original settings. Prefer a test copy for options that change file handling. If a tool offers Test Mode, learn how it affects ordinary visitors first. Test Mode is not a second database backup and cannot replace recovery preparation.
Write down the rollback steps: which option to switch off, how to restore settings, and whether optimized files must be regenerated or a specific cache cleared. Record the login state for both speed measurements and functional checks. An administrator’s normal screen can hide what ordinary visitors actually receive.
With WP Rocket, add one feature at a time
WP Rocket applies automatic features and defaults when activated, but additional options still need review. Its setup guidance recommends enabling one feature at a time and checking key pages in a signed-out browser after each change. Some processing is asynchronous, so wait for the generated output before comparing results instead of judging immediately after Save.
File optimization may remove unused CSS or delay JavaScript loading or execution; media features include lazy loading and image dimensions. Tackle an item only for a defined purpose. For instance, address the loading burden of images below the first screen, then investigate the next bottleneck.
To exclude a page, enter the corresponding URL or path under Advanced Rules → Never Cache URL(s) as documented. This exclusion also disables other optimizations for that page, not just page caching. Where the host manages caching itself, confirm the exclusion with the host as well.
With NitroPack, understand mode changes first
NitroPack offers Standard, Medium, Strong, Ludicrous, and Custom modes with different setting levels. Its current getting-started documentation names Ludicrous as the default, but a default is not suitable for every site. Inspect the actual account settings and adjust according to functional checks; do not ignore a broken layout to chase a mode name.
With Test Mode on, ordinary URLs work without NitroPack optimization. A tester can view an optimized version by adding the testnitro=1 parameter to the URL. This allows a same-page comparison, but if the site already relies on NitroPack for speed, Test Mode also changes what ordinary visitors receive. Schedule an appropriate test window.
After Test Mode is turned off, retained settings apply to production URLs; restore changes you do not intend to adopt first. After a mode switch or other adjustment, save, process caches, and wait for reoptimization according to NitroPack’s procedure. Keep the test-parameter URL and production URL separate in the acceptance record; one result cannot sign off the other.
- Inventory existing settings and confirm the test environment; retain a recoverable baseline.
- Choose one problem to improve and make a small adjustment with the relevant feature or mode.
- Wait for optimization, then check the layout, menus, forms, and shopping actions first.
- Compare under matching measurement conditions; adopt or revert before moving to another item.
If the layout breaks or a button fails, narrow the cause
If a course-outline toggle stops working after a new setting, compare optimized and unoptimized versions to establish whether the original function still works. Roll back the most recently added relevant setting and see whether the issue disappears. Changing the theme, deleting plugins, and clearing all data at the same time would make the cause impossible to identify even if the site recovers.
Removing unused CSS can affect menus, popups, or mobile styles that appear later. Changes to JavaScript loading and execution can also change interaction timing. NitroPack’s troubleshooting guidance suggests lowering the optimization mode or inspecting related features. Preserve the affected page, device, reproduction steps, and setting difference, then use the exclusion method supported by the tool.
Keep an exclusion only as broad as needed to resolve the issue, and record why. For a conflict in one component, adjust its asset or page first. If you cannot isolate it, return to normal settings and send reproducible evidence to support. Do not force caching over a design that protects dynamic data.
Check shopping and membership flows separately
WP Rocket’s WooCommerce documentation says recognized cart, checkout, and account pages, plus the WooCommerce REST API, are automatically excluded from caching according to store configuration. This helps with a basic store, but does not guarantee that custom wishlists, regional pricing, or membership components work. Test them in practice.
Use test products and accounts to check quantity changes, cart contents, form error messages, and member data. If checking payments, use the provider’s test environment and established acceptance method; do not create real transactions just for a speed test. After content updates, confirm that public pages receive the correct version.
Finally compare measurements, functions, and maintenance cost before and after. Record enabled settings, exclusions, reasons, and what to recheck after the next plugin or theme update. The result should make sense to the next administrator; there is no need to enable every option or promise a perfect score after installation.
| Task | Decide who handles it first | Acceptance focus |
|---|---|---|
| Page caching | Host or primary performance tool | Correct updates and personalized data |
| Image handling | Who compresses and who lazy loads | Clarity and appearance timing |
| CSS optimization | Avoid duplicate processing by two tools | Mobile view, popups, expanded states |
| JavaScript optimization | Adjust loading and execution for compatibility | Buttons, forms, and responses |
| Test Mode | Know ordinary and test URL behavior | Clear trial settings before production use |
Clarify the division of caching between the site and CDNWebsite Caching and CDNs: Which Layer to Clear When Updates Do Not AppearA website may be updated while phones still show old content because caches remain in different places. Using a Taiwan studio's business-hours update, this article explains browser, WordPress/hosting and CDN roles, cache responses, expiry times and targeted purging. An ordered procedure, comparison table and original diagram help site managers trace old versions while keeping account and shopping workflows correct.Read the full article
Read speed reports under consistent conditionsHow to Read PageSpeed Insights Scores: The Right Order for Measuring Website SpeedFluctuating PageSpeed Insights scores do not always mean the site has changed. For website managers in Taiwan, this article distinguishes real-user data, Lighthouse tests and score categories, and establishes comparable URLs, devices, versions and test conditions. An original report-reading sequence, improvement log and practical steps help speed checks support concrete decisions instead of merely collecting a high-score screenshot.Read the full article
Back up the site and prepare a restoreHow to back up WordPress: files, databases and restoration drillsA successful backup message is not enough. Build a checklist for WordPress files, databases and off-site copies, then learn the UpdraftPlus and WPvivid controls, restore limitations and isolated drills needed to confirm recovery. Plan schedules, retained versions, configuration files and acceptance records so someone can restore a personal or studio website.Read the full article
Found this guide helpful? Share it with someone who needs it
Lifestyle
Before Resetting WordPress: Separate Content, Theme Settings, and Full Restore
Starting over in WordPress does not always require wiping the site. This guide compares style resets, content revisions, database resets, and full restores; explains the scope of WP Reset and the limits of its snapshots; and walks through a test site, backup checks, and acceptance after a reset. It helps ordinary users in Taiwan identify the actual problem and choose a suitably narrow action with a recovery plan.
Lifestyle
Handling WordPress Comment Spam: Review Rules and Akismet
Stopping spam in WordPress comments takes sensible moderation rules and a way to correct mistakes, as well as a plugin. This guide covers discussion settings, Akismet activation and plan eligibility, reporting spam, and rescuing legitimate comments. Its daily review checklist helps small-site owners reduce the workload while leaving room for readers with real questions to join the discussion.
Lifestyle
Build a personal blog with WordPress: from categories to your first post
To start a personal blog, decide what questions you want to answer over time, then plan the homepage, post list and basic pages. Using WordPress as an example, this guide develops a writing workflow from content categories and reading layouts through the first post and later updates. It also covers checks for post cards, pagination and comments. It is for readers in Taiwan who want to turn their notes into public content: finish a small but complete site first, then add features as needed.
Lifestyle
WordPress Social Login: Checking LINE, Google, and Facebook Connections
Adding LINE, Google, or Facebook login to WordPress takes more than a few buttons. This guide explains how the social-login plugin and provider applications divide the work, how to verify callback URLs, link existing accounts, assign registration roles, and prepare another route before disabling a provider. Using Nextend Social Login as an example, it helps Taiwan-based site owners confirm that ordinary visitors can actually reach their original member accounts.
Articles that cite this one
Sources
- WP Rocket best practices for settingsChecked:
- WP Rocket page exclusion scopeChecked:
- WP Rocket and WooCommerceChecked:
- NitroPack initial setup and modesChecked:
- NitroPack Test Mode behaviorChecked:
- NitroPack with other caching pluginsChecked:
- NitroPack troubleshooting for broken layoutsChecked:
Compiled from the references and verification dates listed above; fares, schedules, product features, and terms can change, so please confirm the latest details on the relevant official website before travelling, booking, or purchasing.